TL;DR:
- Migrating from Heroku to AWS involves replacing platform services with explicit AWS components and containerizing applications. Proper planning, including service mapping, database transfer, and staged cutover, minimizes downtime and data loss. Teams succeed by documenting current configurations, building reproducible CI/CD pipelines, and executing a careful, validated transition.
Heroku to AWS migration is the process of moving applications, data, and services from Heroku’s platform-as-a-service environment to AWS cloud infrastructure, giving your team greater control, configurability, and cost efficiency. The core shift involves replacing Heroku’s abstracted platform features with explicit AWS services: ECS Fargate for compute, Amazon RDS for PostgreSQL databases, ElastiCache for Redis, and Secrets Manager for configuration. AWS gives you far more power than Heroku, but that power comes with real operational responsibility. This guide covers every major phase, from service mapping and containerization to database migration and staged cutover, so your team can execute the move without surprises.
What AWS services replace Heroku components?
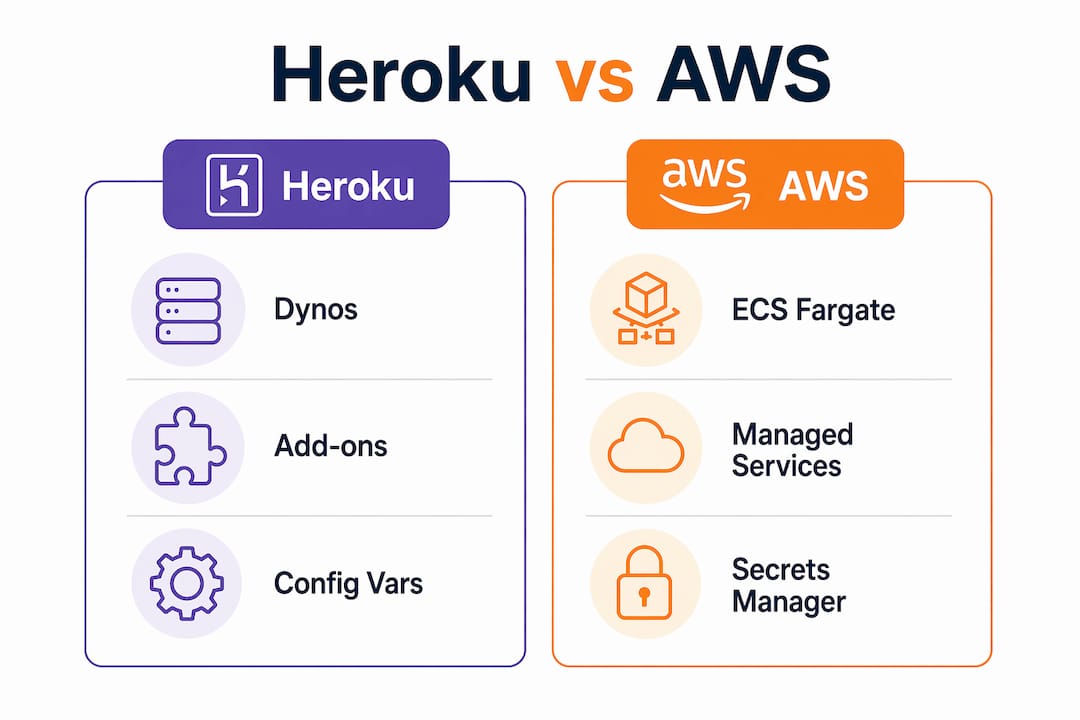
Mapping Heroku to AWS equivalents is the foundation of any successful migration plan. Every Heroku abstraction has a direct AWS counterpart, and understanding those mappings before writing a single line of infrastructure code saves weeks of rework.

| Heroku component | AWS equivalent | Migration note |
|---|---|---|
| Dynos (web/worker) | ECS Fargate tasks | Requires Dockerfile; no buildpacks |
| Heroku Postgres | Amazon RDS for PostgreSQL | Use pg_dump or AWS DMS for transfer |
| Heroku Redis | Amazon ElastiCache | Export RDB snapshot for data transfer |
| Config Vars | Secrets Manager / Parameter Store | Reference at runtime, not build time |
| Heroku Router | Application Load Balancer (ALB) | Configure target groups and health checks |
| Heroku Pipelines | CodePipeline or GitHub Actions | Explicit build, test, and deploy stages |
| Heroku Kafka add-on | Amazon MSK | Broker config requires explicit setup |
| RabbitMQ add-on | Amazon MQ | Add-on equivalents simplify planning |
The Application Load Balancer replaces Heroku Router’s traffic distribution, but you must configure health check paths and target group rules yourself. Heroku handled that silently. On AWS, every routing decision is explicit and auditable.
Pro Tip: Before provisioning any AWS resource, write out your current Heroku add-ons and their configurations. That list becomes your AWS service shopping list and prevents gaps during cutover.
How do you containerize a Heroku app for AWS?
Containerizing your application is the single most critical technical step when moving to ECS Fargate. Heroku uses buildpacks and slugs to package your app automatically. AWS ECS expects a Docker image stored in Amazon ECR.
Follow this checklist to containerize correctly:
- Write a Dockerfile. Replace your Procfile commands with a CMD or ENTRYPOINT instruction. Your web process becomes the container’s default command.
- Set PORT explicitly. Heroku injects the PORT environment variable automatically. In your Dockerfile and ECS task definition, declare it explicitly or your app will not bind correctly.
- Copy only what you need. Use a .dockerignore file to exclude node_modules, .git, and local config files. Bloated images slow deployments and increase ECR storage costs.
- Push to Amazon ECR. Tag your image with a commit SHA, not just “latest.” This makes rollbacks trivial because each deployment maps to a specific image version.
- Test locally first. Run docker compose up with the same environment variables your ECS task will use. Catching port or secret mismatches locally is far cheaper than debugging a failed Fargate deployment.
- Integrate image builds into CI/CD. Your pipeline should build, tag, push to ECR, and then trigger an ECS service update in sequence. GitHub Actions and CodeBuild both support this pattern natively.
Pro Tip: If your team relies on a Heroku buildpack for a specific runtime, you can use that buildpack as a Docker build step via the Cloud Native Buildpacks (CNB) specification. This preserves your existing build logic while producing a standard OCI image compatible with ECS Fargate.
A common mistake is assuming Heroku’s slug size limits apply on AWS. They do not. However, large images still hurt cold start times on Fargate, so keep your images lean regardless.
How do you migrate databases and stateful services?
Database migration carries the highest risk in any cloud move. A failed or partial database transfer can corrupt production data or leave your application in an inconsistent state.
These prerequisites must be in place before you start any data transfer:
- Verify schema compatibility. Confirm your PostgreSQL version on Heroku matches or is lower than your target RDS version.
- Run a full pg_dump test. Export your Heroku Postgres database and restore it to a staging RDS instance. Measure the time this takes. That number sets your maintenance window estimate.
- Use AWS Database Migration Service for near-zero downtime. AWS DMS supports continuous replication from Heroku Postgres to RDS, letting you keep Heroku live while AWS catches up on writes.
- Export Redis data carefully. ElastiCache does not accept direct RDB imports from all Redis versions. Test your snapshot restore on a staging ElastiCache cluster before the production cutover.
- Sequence your migration correctly. Migrate the database first, validate data integrity, then deploy the new application version. Deploying the app before the database is ready causes immediate failures.
Heroku handles schema migrations automatically as part of its release phase. AWS does not. You must run migration jobs explicitly as part of your deployment pipeline, before the new application version receives traffic.
The safest schema migration pattern is expand, migrate, contract. Add new columns or tables first (expand), deploy the code that uses them (migrate), then remove the old columns in a separate deployment (contract). This approach means any deployment can be rolled back without breaking the database.
Pro Tip: Always take a final pg_dump snapshot immediately before switching production traffic to AWS. If a rollback becomes necessary after writes start on the AWS database, that snapshot is your last clean restore point.
How do you rebuild your deployment pipeline on AWS?
Heroku’s implicit platform features like auto-scaling, health checks, and log drains must be rebuilt explicitly on AWS. This is where most teams underestimate the work involved.
A production-grade AWS deployment pipeline includes these stages in order:
- Build. Compile code, run unit tests, and build the Docker image. Fail fast here to avoid pushing broken images.
- Publish. Push the tagged image to Amazon ECR. Record the image URI for downstream stages.
- Deploy. Update the ECS service with the new task definition referencing the new image URI.
- Migrate. Run database schema migrations as a one-off ECS task before the new app version receives traffic.
- Verify. Execute smoke tests against the new deployment. Check HTTP status codes, key API endpoints, and background job queues.
- Rollback trigger. If verification fails, redeploy the previous task definition automatically. ECS makes this a single API call.
For environment variables and secrets, never bake values into your Docker image. Reference AWS Secrets Manager or Parameter Store at runtime inside your ECS task definition. This keeps credentials out of your image registry and makes secret rotation straightforward.
AWS networking requires explicit design of VPCs, subnets, routing tables, and security groups. Heroku’s networking was opaque by design. On AWS, you define which services can talk to each other, which ports are open, and which subnets are public versus private. Getting this right from the start prevents security gaps that are painful to fix after launch.
For logging and monitoring, CloudWatch Logs replaces Heroku log drains. Set up log groups per service, define retention policies, and create CloudWatch Alarms for error rate spikes and latency thresholds. Pair this with a DevOps observability practice that treats alerts as actionable signals, not noise.
Pro Tip: Run your full pipeline against a staging environment that mirrors production before touching production. The first time your pipeline runs end-to-end should never be against live traffic.
How do you execute a staged cutover with minimal downtime?
Zero-downtime cutover requires running your AWS environment in parallel with Heroku before switching any production traffic. Rushing this phase is the most common cause of migration-related outages.
Follow these steps in sequence:
- Lower your DNS TTL to 60 seconds at least 48 hours before the planned cutover. This ensures DNS changes propagate quickly when you flip traffic.
- Point your AWS app at the Heroku database initially. This lets you validate the full application stack on AWS without risking data divergence between two databases.
- Run functional smoke tests on AWS. Verify login flows, payment processing, background jobs, and any integration webhooks before touching DNS.
- Freeze risky changes. No new feature deployments, schema changes, or dependency upgrades during the cutover window.
- Switch DNS to the AWS Application Load Balancer. Monitor error rates and latency in real time for at least 30 minutes after the switch.
- Migrate the database to RDS once traffic is stable on AWS and you have confirmed no rollback is needed.
- Decommission Heroku only after running AWS in production for at least one full business cycle.
Your validation checklist after cutover should cover:
- HTTP 200 responses on all critical endpoints
- Background job queue depth returning to baseline
- Database connection pool utilization within normal range
- No spike in 5xx error rates in CloudWatch
Rollback after data writes start on AWS is significantly more complex than rollback before writes begin. The safest rollback window is the period between DNS cutover and database migration. Once both are complete, rolling back means restoring from your pre-cutover pg_dump snapshot and accepting data loss for the intervening period. Plan your cutover window to minimize that risk.
Review your full migration readiness checklist before scheduling the production cutover date. Teams that skip formal readiness reviews consistently encounter avoidable failures.
Key Takeaways
A successful Heroku to AWS migration requires explicit service mapping, containerization, database sequencing, and staged traffic cutover executed in the correct order.
| Point | Details |
|---|---|
| Map services before you build | Identify every Heroku add-on and its AWS equivalent before writing infrastructure code. |
| Containerize with explicit config | Replace buildpacks with Dockerfiles and declare PORT and secrets explicitly in ECS task definitions. |
| Sequence database migration carefully | Migrate and validate data before deploying the new app version to avoid partial failures. |
| Rebuild CI/CD with explicit stages | Include build, publish, deploy, migrate, verify, and rollback stages in every pipeline. |
| Stage your cutover | Run AWS in parallel, lower DNS TTL early, and keep Heroku live until AWS is fully validated. |
What I’ve learned from migrations teams get wrong
Most teams treat a Heroku to AWS migration as a platform switch. It is not. It is an engineering project that requires you to understand every behavior Heroku was handling silently on your behalf.
The most dangerous assumption I see is that because the application code does not change, the migration is low risk. The code may not change, but the runtime contract changes completely. Health check intervals, graceful shutdown signals, environment variable injection, and log routing all work differently on AWS. Teams that do not document their current Heroku behaviors before starting the migration spend weeks chasing configuration drift that was entirely preventable.
Database rollbacks deserve more planning than most teams give them. I have seen teams execute a clean DNS cutover, declare success, and then discover a schema migration failed halfway through. Without the expand-migrate-contract pattern in place, rolling back means choosing between data loss and a broken schema. Neither is acceptable in production. Build rollback paths into your schema migration plan before you start, not after something goes wrong.
The teams that migrate successfully share one trait: they treat observability as a first-class deliverable, not an afterthought. Before go-live, they have CloudWatch dashboards, alarms, and runbooks in place. They know what “normal” looks like on AWS because they ran load tests against staging. When production traffic arrives, they are watching metrics, not guessing. That preparation is what separates a smooth cutover from a 3 AM incident.
For teams planning their first AWS move, reviewing AWS migration best practices before starting the service mapping phase saves significant rework later.
— Oleksandr
IT-Magic’s managed Heroku to AWS migration services
Moving from Heroku to AWS is a well-defined engineering problem. Executing it without downtime, data loss, or security gaps requires experience across containerization, database migration, networking, and deployment automation.
IT-Magic is an AWS Advanced Tier Partner with 700+ completed migration projects, including complex eCommerce and fintech workloads where downtime directly translates to lost revenue. The team covers the full migration lifecycle: infrastructure audit, containerization, database transfer, CI/CD pipeline setup, and post-migration cost optimization. Every engagement includes hands-on execution, not just a migration plan document. Teams that need to move off Heroku quickly and safely can start with a migration assessment to get a clear scope, timeline, and risk profile before committing to a cutover date. For teams concerned about post-migration spend, IT-Magic also provides AWS cost optimization reviews to right-size infrastructure after the move.
FAQ
What is the fastest way to migrate from Heroku to AWS?
The fastest path is containerizing your app with Docker, deploying to ECS Fargate, and using AWS DMS for continuous database replication. This approach lets you run AWS in parallel with Heroku and switch traffic via DNS with minimal downtime.
Which AWS service replaces Heroku dynos?
Amazon ECS Fargate is the standard replacement for Heroku dynos. Each Fargate task runs a Docker container with explicit CPU and memory allocation, replacing Heroku’s dyno size tiers.
How do you handle Heroku config vars on AWS?
Store config vars in AWS Secrets Manager or Parameter Store and reference them in your ECS task definition at runtime. Never bake environment-specific values into your Docker image.
How long does a Heroku to AWS migration take?
Migration timelines vary by application complexity. A simple web app with one database can migrate in one to two weeks. Applications with multiple add-ons, complex schemas, and high traffic volumes typically require four to eight weeks of planning and execution.
What are the biggest risks in a Heroku to AWS migration?
The two highest-risk areas are partial database migrations and configuration drift from undocumented Heroku behaviors. Both are preventable with the expand-migrate-contract schema pattern and a thorough pre-migration audit of your current Heroku environment.